
How to Send Facebook Leads to ClosingFox Using Pabbly Connect or Make.com
Connect Facebook Lead Ads to ClosingFox using Pabbly Connect or Make.com. Step-by-step guide — no coding, 15 minutes setup, leads flow in automatically.
Why Pabbly or Make.com?
Facebook doesn’t send leads directly to most CRMs. It stores them in its own system. You need a middle tool to grab the lead from Facebook and push it to ClosingFox.
That middle tool is Pabbly Connect or Make.com. Think of it like a courier — Facebook hands over the lead, the courier delivers it to ClosingFox.
| Pabbly Connect | Make.com | |
|---|---|---|
| Pricing | Lifetime deal available (~$249). Monthly from ~$16/mo | Free tier: 1,000 ops/month. Paid from ~$9/mo |
| Facebook trigger | Instant (real-time) | Polls every 1-15 min (depends on plan) |
| Best for | Teams who want one-time payment, no monthly bills | Teams with low volume who want free tier |
| Ease | Slightly simpler UI | More powerful but slightly more steps |
Both work great. Pick whichever you prefer. The steps below cover both.
Before you start
You need:
- A ClosingFox account with admin access
- A Facebook Page with an active Lead Ad form (the ad must be running or have run before)
- You must be an Admin on that Facebook Page
- A Pabbly Connect or Make.com account (free sign-up works to start)
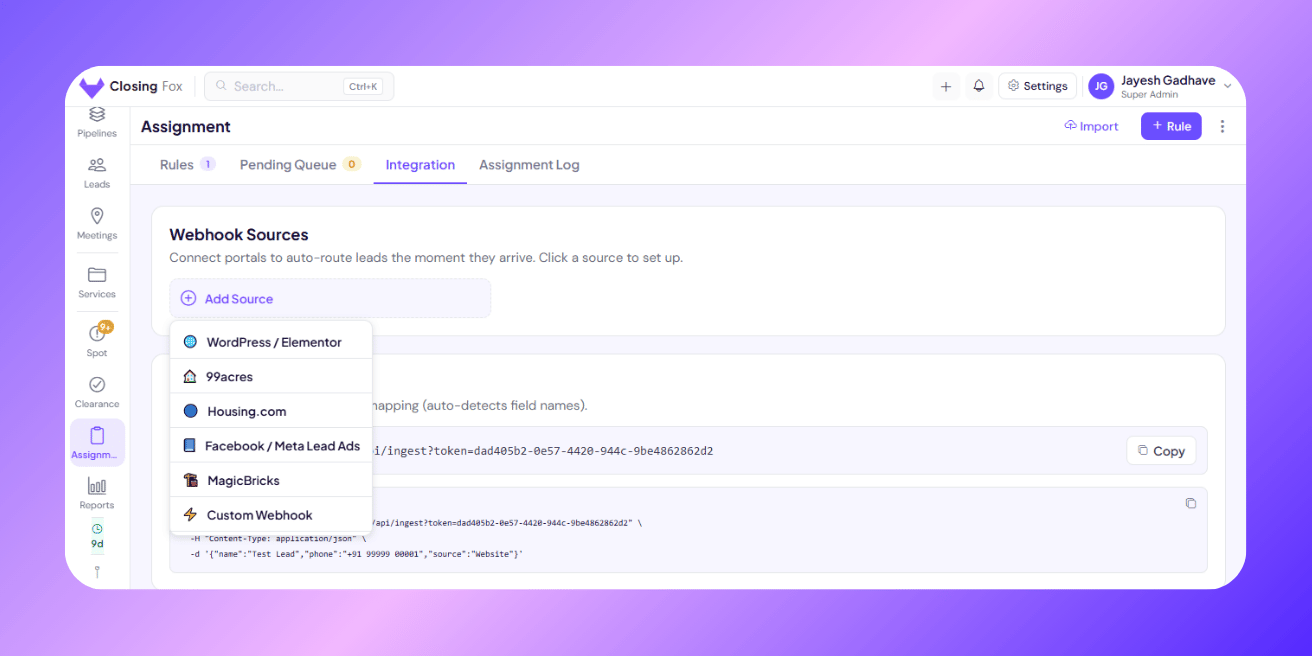
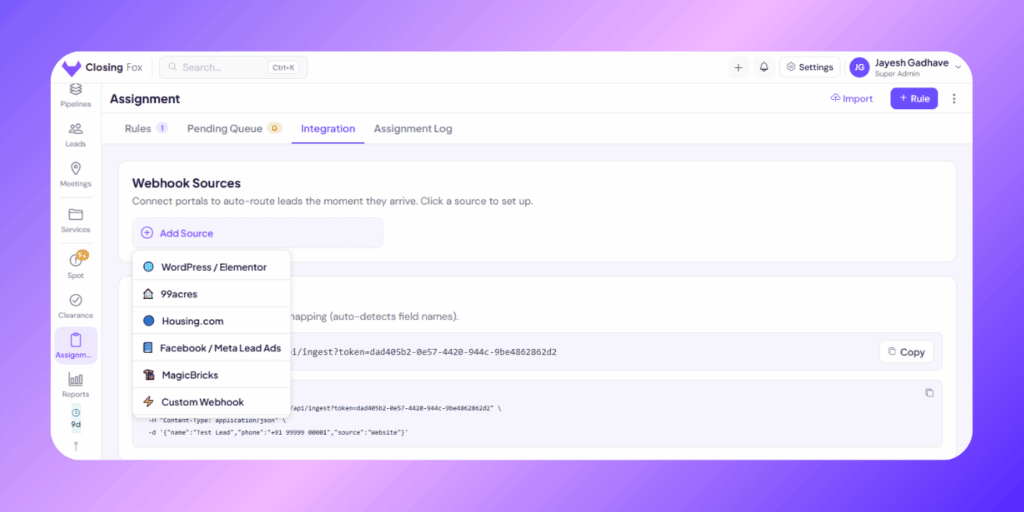
Part 1: Get your ClosingFox webhook link (2 minutes)
This is the link where leads will be sent. You create it once.
- Open ClosingFox (web or app)
- Go to Assignment (sidebar or bottom menu)
- Tap the Integration tab
- Tap + Add Source
- Select Custom Webhook
- Name it: “Facebook Leads — Pabbly” (or Make.com)
- You’ll see a link like:
https://api.closingfox.com/api/ingest?token=abc123&src=xyz456Copy this link. You’ll paste it in Pabbly or Make.com in Part 2.
- Tap “Start Listening for Test” — keep this tab open
Part 2A: Set up Pabbly Connect
Skip to Part 2B if you’re using Make.com instead.
Step 1: Create a new workflow
- Log in to Pabbly Connect
- Click “Create Workflow”
- Name it: “Facebook Leads → ClosingFox”
Step 2: Set up the trigger (Facebook Lead Ads)
- In the Trigger step, search for “Facebook Lead Ads”
- Select it
- Trigger event: “New Lead (Instant)”
- Click “Connect” — log in to Facebook when prompted
- Grant all the permissions it asks for (Page access, lead access)
- Select your Facebook Page from the dropdown
- Select your Lead Form from the dropdown
- Click “Save & Send Test Request”
You should now see sample data like: full_name: "John Doe", email: "john@test.com", phone_number: "+919876543210"
Step 3: Set up the action (send to ClosingFox)
- Click the “+” below the trigger to add an action
- Search for “API by Pabbly Connect”
- Action event: “Send HTTP Request”
- Configure:
- Method:
POST - URL: Paste your ClosingFox webhook link from Part 1
- Payload Type:
JSON
- Method:
Pabbly shows an “Add Headers” checkbox at the top. Do NOT put your lead fields (name, phone, budget) there. Headers are for technical settings only. Your lead data goes in the Body section below.
Step 4: Map the fields (in the Body — NOT Headers)
Scroll down past the “Add Headers” section. You’ll see the Body / Payload area with Label + Value pairs. This is where your lead fields go:
| Label (type exactly) | Value (pick from dropdown) |
|---|---|
name | Select → Full Name from Facebook |
phone | Select → Phone Number from Facebook |
email | Select → Email from Facebook |
source | Type manually: Facebook Ads |
project | Type your project name, e.g. Godrej Horizon |
How it looks in Pabbly:
- In the Label box, type the field name exactly as shown above (e.g.,
name) - In the Value box, click inside — a dropdown shows Facebook fields
- Pick the matching one (e.g., Full Name for
name, Phone Number forphone) - For
source, don’t use the dropdown — just typeFacebook Adsmanually - Click the + button to add more fields
Optional: Add a header for Content-Type
- Check “Add Headers”
- Add just ONE header: Label =
Content-Type, Value =application/json - No other fields in Headers — only Content-Type goes here
source to a fixed value like "Facebook Ads" or "99acres". This lets you create assignment rules in ClosingFox that auto-assign leads by source. > Tip: If your lead form has extra fields (budget, configuration, city), add them the same way. Any field you send will be saved automatically — ClosingFox doesn’t reject extra fields. Step 5: Test and activate
- Click “Save”
- Click “Test” — Pabbly sends the sample lead to ClosingFox
- Go back to ClosingFox — you should see “Test received!”
- In Pabbly, toggle the workflow ON
Done! Skip to Part 3.
Part 2B: Set up Make.com
Skip this if you already set up Pabbly above.
Step 1: Create a new scenario
- Log in to Make.com
- Click “Create a new scenario” (top right)
- You’ll see a blank canvas with one empty circle
Step 2: Add the Facebook trigger
- Click the empty circle (or the + icon)
- Search for “Facebook Lead Ads”
- Select “Watch New Leads”
- Click “Add” next to Connection — log in to Facebook
- Grant permissions (lead access, page access)
- Select your Facebook Page
- Select your Lead Form
- Click “OK”
Step 3: Add the HTTP action
- Click the “+” to the right of the Facebook module
- Search for “HTTP”
- Select “Make a request”
- Configure:
- URL: Paste your ClosingFox webhook link from Part 1
- Method:
POST - Body type:
Raw - Content type:
JSON (application/json)
Step 4: Map the fields
In the Request content box, type this JSON. Click inside each value — a panel appears on the left showing Facebook fields. Click the field to insert it:
{ "name": "{full_name}", "phone": "{phone_number}", "email": "{email}", "source": "Facebook Ads", "project": "{your project name}", "location": "{city}" }How to do it in Make.com:
- Type the JSON with field names on the left
- Place your cursor where the value should go
- A mapping panel appears on the left showing Facebook Lead Ads fields
- Click a field — Make inserts a green pill/tag
- That green pill means the value comes dynamically from Facebook
field_data. Make.com usually flattens this automatically. If you see nested fields, use get() or map() functions to extract values — or just click the field name in the panel. Step 5: Test and activate
- Click “Run once” (bottom left) to test
- Submit a test lead on Facebook (Ad Manager → Preview your ad → fill form)
- Make.com catches it and sends it to ClosingFox
- Check ClosingFox — you should see “Test received!”
- Turn on the scenario: toggle the scheduling switch (bottom left) to ON
- Set the interval — how often Make checks Facebook:
- Free plan: every 15 minutes
- Paid plan: as fast as every 1 minute
Part 3: Finish setup in ClosingFox (5 minutes)
Now that the test lead arrived, complete the connection:
Map the fields
- Go back to ClosingFox → Assignment → Integration
- Open the source you created in Part 1
- You’ll see the test data in a table — confirm which field is Name, Phone, Email, etc.
- Most fields auto-match. Fix any that don’t.
- Set Lead Source to: “Facebook Ads”
- Click Activate
Create an assignment rule
- Go to Assignment → Rules tab
- Tap + New Rule
- Name it: “Facebook Leads”
- Add a condition:
- Field: Source
- Operator: contains
- Value: Facebook
- Pick who should get these leads (one or more salespeople)
- Pick the Pipeline and Starting Stage
- Save
You’re live! The full flow
Here’s what happens every time someone fills your Facebook Lead Ad form:
- Person fills your ad form on Facebook/Instagram
- Pabbly/Make.com grabs the lead (instantly for Pabbly, 1-15 min for Make)
- Sends it to ClosingFox via your webhook link
- ClosingFox checks for duplicates (same phone = flagged, not duplicated)
- Assignment rule matches → lead is auto-assigned to the right salesperson
- Salesperson gets a push notification on their phone
- Lead appears everywhere — Dashboard, Leads list, Kanban board
Zero manual work. Zero missed leads. Response time: seconds instead of hours.
Troubleshooting
Pabbly/Make says “No test data found” from Facebook
You need to submit an actual test lead. Go to Facebook Ad Manager → find your lead ad → click Preview → fill in the form → submit. Then go back and retry.
Test lead sent but ClosingFox doesn’t show “Test received”
Check these:
- Did you paste the full link? No missing characters at the end?
- Did you set the method to POST (not GET)?
- Did you set Content-Type to application/json?
- Did you click “Start Listening for Test” in ClosingFox before sending?
- Check Pabbly/Make execution log — does it show a green checkmark or a red error?
Leads arrive but name/phone is empty
Your field mapping is wrong. Go back to Pabbly/Make → open the HTTP step → check that you mapped full_name to "name" and phone_number to "phone". The left side (JSON key) must be exactly: name, phone, email.
Facebook says “permission denied” or “page not found”
You must be an Admin on the Facebook Page (not just Editor or Moderator). Go to your Page → Settings → Page Roles → check your role. Also make sure you granted all permissions when connecting Facebook in Pabbly/Make.
Make.com leads arrive late (10-15 minute delay)
Make.com polls Facebook — it checks every few minutes for new leads. Free plan: every 15 minutes. Paid plan: as fast as every 1 minute. If you need instant delivery, use Pabbly Connect instead — it uses an instant trigger (real-time).
Can I use both Pabbly and Make at the same time?
Yes, but don’t connect both to the same lead form — you’ll get duplicates. Use one tool per form.
What if I have multiple lead forms for different projects?
Create one workflow per form. Each workflow sends to the same ClosingFox webhook link — but set a different "project" value in the JSON for each one. Then create separate assignment rules in ClosingFox by project.
Is Pabbly/Make.com free?
Make.com: Free tier = 2 scenarios, 1,000 operations/month. Good for low volume (under ~30 leads/day).
Pabbly Connect: No permanent free tier. Paid plans from ~$16/month or lifetime deal (~$249 one-time). Better value for high volume.
Quick reference: the JSON body
This is exactly what Pabbly/Make should send to ClosingFox. Copy this and replace the values with mapped fields:
{ "name": "full_name from Facebook", "phone": "phone_number from Facebook", "email": "email from Facebook", "source": "Facebook Ads", "project": "Your Project Name", "location": "city from Facebook" }Only name is required. Everything else is optional but recommended.
All supported fields
| JSON key | What it is | Example |
|---|---|---|
| name | Lead’s name (required) | Rahul Sharma |
| phone | Phone number | +91 99999 00001 |
| Email address | rahul@gmail.com | |
| source | Where they came from | Facebook Ads |
| project | Interested project | Seaview Towers |
| location | City or area | Andheri West |
| config | Unit type / BHK | 2 BHK |
| budget | Budget range | 80L – 1Cr |
| campaign_name | Ad campaign name | Mumbai Launch Q2 |